Managing the GRIB list
BeginnerThe essentials
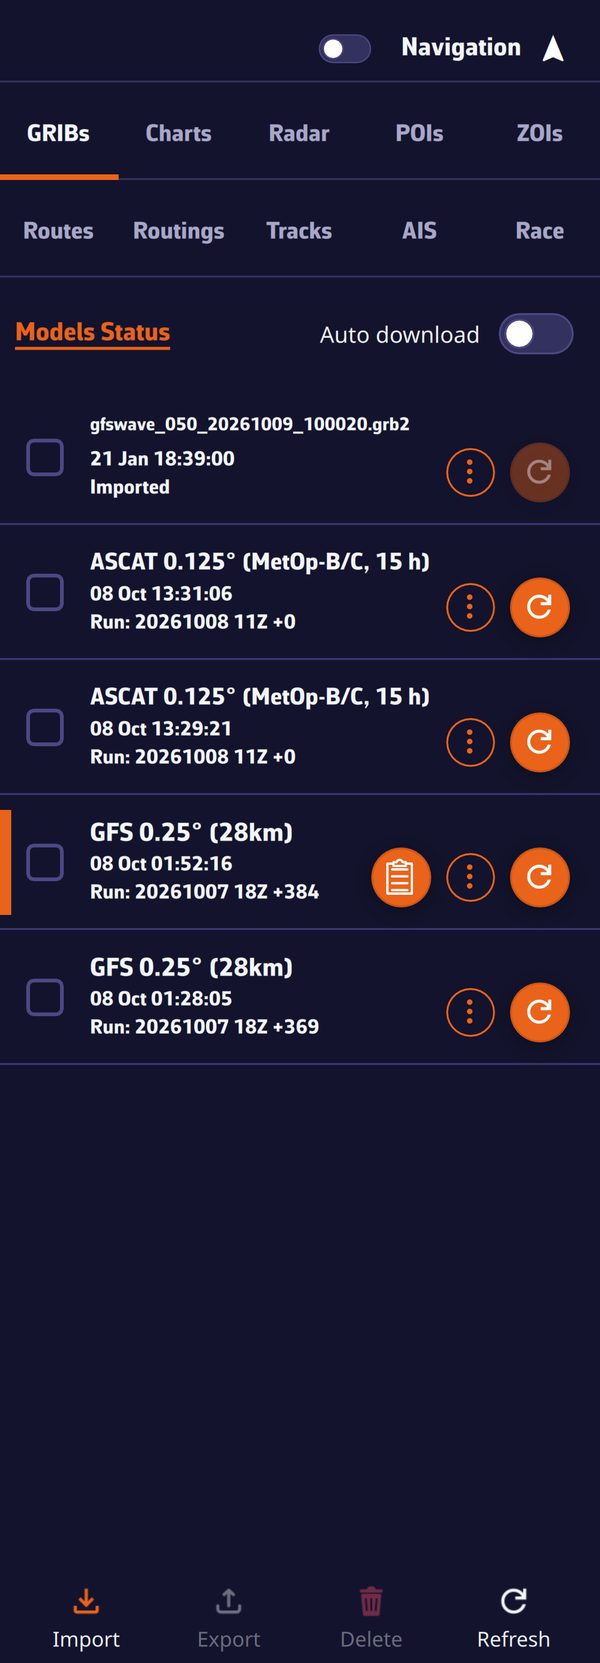 The GRIBs tab of the left drawer
All your GRIB files are stored in the “GRIBs” tab, the first one in the left drawer. Open this drawer with the chevron handle (›) at the left edge of the screen. This is where you choose the file displayed on the chart, update it when the model has published a more recent forecast, and rename, export or delete it.
- Tap a row to display that GRIB on the chart. A colored bar at the left edge of the row marks the displayed file. Tap the same row a second time to remove it from the chart. Only one GRIB is displayed at a time.
- Update a file when the round button to the right of its row (circular arrow) lights up: a new run of the model has been published. Tap it, and the file is replaced by the new forecast.
- Update everything at once: the “Refresh” button at the bottom of the tab updates all the files that need it.
- Rename, export, delete: open the ⋮ menu of the row.
Going further
What a row shows
- The name: the one you gave the file, otherwise the model name (“Arome 0.025° (3km)” for example), preceded by the zone name if you entered one in “Suggested models”. An imported file keeps its file name; an archive is called “ECMWF IFS 0.25° archive · start → end” (0.5° or 1° if the grid spacing was reduced).
- The second line: the date and time of the download on this device, or “Missing” if the file is not there.
- The third line: “Run:” followed by the run of the file for a downloaded model, “Imported” for an imported file, “Historical” for an archive.
- The checkbox, on the left, is only used for grouped actions (exporting or deleting several files). It does not display the GRIB.
- The buttons on the right: the meteogram (table icon, only visible on the displayed GRIB when the center of the chart is within its area, see Meteogram), the ⋮ menu, then the round refresh or download button.
The list is sorted by date of first download, the most recent at the top. An update does not change the order. Missing files are dimmed and placed at the bottom.
Updating a GRIB
A weather model is recomputed several times a day; each computation is called a run. NavimetriX learns of the publication of a new run in real time and also checks the state of the models every five minutes.
- The round button on the row shows a circular arrow. It is only active if a run more recent than that of your file is available, and no download is in progress.
- It shows a download arrow when the file is “Missing”: you requested it on another device of your account, and it is not yet on this one. Tap it to fetch it.
- During the update, the “Preparing GRIB file” then “Downloading GRIB file” window shows the progress. The old file is then deleted: the row keeps its name, its zone and its parameters.
- “Refresh”, in the bottom bar, updates all the files that have a new run and also downloads the missing files. The “Refreshing all GRIB files” window lets you “Cancel”.
 Refresh button lit: a new run is available
Automatic download
The “Auto download” switch, at the top of the tab, is off by default. When on, it downloads the new runs of your GRIBs without you having to tap the button on each row:
- as soon as you turn it on;
- when the application returns to the foreground;
- each time a new run is detected.
It only triggers on a new run; it then also fetches the “Missing” files. Without a new run, a file that is “Missing” on this device is fetched with its button or with “Refresh”. The setting is shared between the devices of your account. It requires an Internet connection; if your data plan is limited, leave it off and update by hand.
In the browser version, at first startup, all the GRIBs of the account are downloaded once.
Synchronization between your devices
The GRIB list follows your account: a file downloaded on one device appears on the others, marked “Missing” until you fetch it. The names you gave, the zone names, the “Auto download” setting and deletions also pass from one device to another, as does the choice of the displayed GRIB. Only imported files stay on the device where you imported them.
Renaming
- ⋮ menu of the row, “Rename”: the “Rename GRIB” window offers the current name in the “GRIB name:” field.
- Or a long press (or long click) on the name: it becomes editable in place. Enter or a tap outside the field saves, Esc cancels.
An empty name, or the model name itself, gives the file back its default name. The chosen name is kept across updates and on your other devices.
The zone name
When you use the magic wand of the area selection, the “Suggested models” window offers a “Zone name” field (8 characters at most, optional). This name is shown in front of the name of each of the GRIBs downloaded together, in the form “Zone - Model”: handy to recognize at a glance the files of a same sailing plan. A name given with “Rename” replaces it. See Download a GRIB.
Deleting
- One file: ⋮ menu of the row, “Delete”.
- Several files: tick their checkboxes, then “Delete” in the bottom bar.
NavimetriX always asks for confirmation. Deletion also applies to your other devices.
Importing an external GRIB
You received a GRIB by email, or downloaded it elsewhere: tap “Import” in the bottom bar. The “Import GRIB File” window accepts the extensions .grb, .grb2, .grib1 and .grib2, as well as .grb and .grb2 compressed as .bz2 or .gz, decompressed on import. For another extension (.grib for example), choose “All files”. Both GRIB1 and GRIB2 formats are read.
The file must contain wind, current or waves, otherwise NavimetriX refuses it and lists the parameters it found. An accepted file is displayed on the chart right away. It stays on this device: it is not synchronized, and it is not updated since it does not come from a model of the catalog.
Exporting and sharing
- On a computer, “Export” asks for a destination folder (the Downloads folder is suggested).
- On phones and tablets, the same button is called “Share” and opens the system share sheet (email, messaging, files…).
For a single file, use the ⋮ menu of its row; for several, tick them then use the bottom bar. A “Missing” file cannot be exported. A wave file in GRIB2 format is rewritten on export so that other navigation software can read it: its messages are sorted by forecast time and, if it has no separate swell, a copy of the total sea is added to it as swell.
Model status
The “Models Status” link, at the top of the tab, opens in your browser the page that gives, model by model, the time of the latest runs available on our servers.