Start a routing
BeginnerThe essentials
A routing is calculated on a route (at least a start and a finish) with a wind GRIB file downloaded to the device. The polar used is the one chosen in “Settings”, “My Boat”.
- Tap the “+” button at the bottom right of the chart, then “Calculate Routing”. The “Routing” window opens.
- In “Models”, choose the “Wind” GRIB. If you wish, add a “Current” GRIB and a “Waves” GRIB.
- In “Start”, set the start date and time, or tap “Now”.
- In “Route”, choose the route to follow.
- Tap “Calc Routing”.
The isochrones are drawn on the chart during the calculation. At the end, the routing is displayed and the “Routings” tab of the left drawer opens.
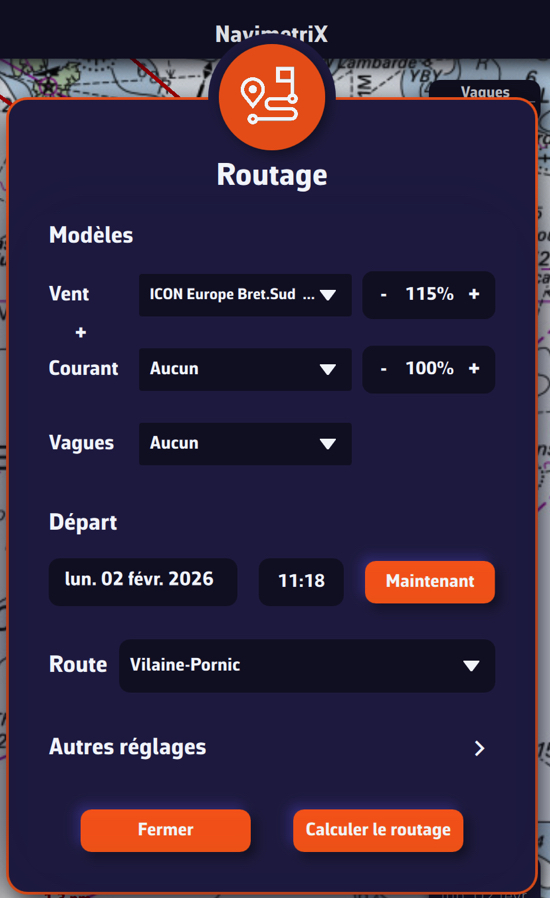 The Routing window: weather files, start and route
If something is missing, the window does not open and a message says so: “Please download a GRIB file with wind forecast data before launching a routing.” or “Please create a route before launching a routing.”
Going further
The other ways to open the window
- From a route on the chart: tap (or click) a segment or a point of the route, then choose “Calculate routing” in its menu. The window opens with that route already chosen.
- From a POI: “Route to this POI”, in the POI’s menu, opens the window on a route from the boat to the POI. See Routings started from the chart.
Models: wind, current, waves
Each list offers only the GRIBs downloaded on this device that cover at least part of the route: a waypoint inside the GRIB’s area, or a segment that crosses it. When you start from the boat’s position, that position counts too.
- Wind (required). On opening, the window chooses the GRIB displayed on the chart, if it contains wind. On the right, a percentage applies to the GRIB’s wind speed, from 80 to 150% (100% by default). Above 100%, the routing counts more wind than the file forecasts, which is useful if you find the model too weak.
- Several wind GRIBs: the small “+” under the “Wind” row adds a row for a second model, and so on as long as other wind GRIBs are available; the “−” removes a row. Each row has its own percentage. How it works is detailed in Multi-GRIB routing.
- Current: “None”, “SHOM atlases” (the tidal current atlases) or a current GRIB. The percentage, from 80 to 150%, applies to the current speed.
- Waves: “None” or a sea state GRIB. Waves are used for the height limits and the crossed sea set in Routing settings.
If the chosen wind GRIB is an ensemble GRIB, only one wind row remains possible and the bottom button becomes “Calculate ensemble routings”.
To get started, route with wind alone first, then add current and waves if the area warrants it.
Start at a given date
The date and time are set in the two fields under “Start”; the “Now” button enters the current time. They are expressed in the time zone chosen in “Settings”, “General”, “Time zone” (UTC or local time).
The window remembers the last chosen date for 36 hours, as long as that start is in the future (or if you changed it less than 30 minutes ago). Otherwise, it starts again from the current time.
The start must fall within the period covered by the wind GRIB, and the first point of the route within its area. Otherwise a message gives the file’s forecast period, or the out-of-area position, and the calculation does not start.
Start now, from the boat
The “Now from my position” switch appears only when the app receives a real position of the boat (the device’s GPS or NMEA, usually in Navigation mode). An approximate position derived from the IP address is not enough.
When you turn it on:
- the date and time disappear: the start is the time of launch;
- the route the boat is following is chosen, if it is in the list;
- a “Next Waypoint” row appears. It offers the waypoint the boat is heading for; change it if you have already passed some points.
The routing then starts from the boat’s position and joins the route at that waypoint, ignoring the previous points. This is how to redo a routing at sea, after a deviation from the route or the arrival of a new GRIB run. If the position disappears in the meantime, the message “Cannot start routing: boat position is not available” is displayed.
Best start
The “Best start” switch tries several start times and keeps the fastest. Its “Window” and “Step” settings are described in Best start.
Route
The “Route” list offers the routes visible on the chart. A hidden route (eye closed in the “Routes” tab) does not appear there, unless no route is visible: the first route is then offered. To create or edit a route, see Create and edit a route.
Route marks to be left to port or to starboard are rounded like gates. If a mark sits in a sharp turn (55° or less between the two segments), the app offers before the calculation to turn it into a waypoint: see Coastal routing with C-MAP charts.
Other settings
The “Other settings” row, at the bottom of the window, opens the routing settings (polar, efficiencies, penalties, engine, limits…) without leaving the window. They are the same as in “Settings”, “Routing”: see Routing settings.
During and after the calculation
- Only one routing is calculated at a time.
- The “Cancel routing” button, at the top of the chart, stops the calculation.
- A current or wave file that cannot be found on the device does not prevent the calculation: a message says the routing is calculated without current or without waves.
- If the polar cannot be read, a message invites you to choose another in “Settings”, “My Boat”.
- Without a Premium subscription, the routing covers at most 2 days.
- In the browser version, the first routing first downloads the “Coastal data for routing (one-time download)”.
How the calculation works and how to read the isochrones are described in Routing principles and isochrones.