Create and Edit a POI
BeginnerThe essentials
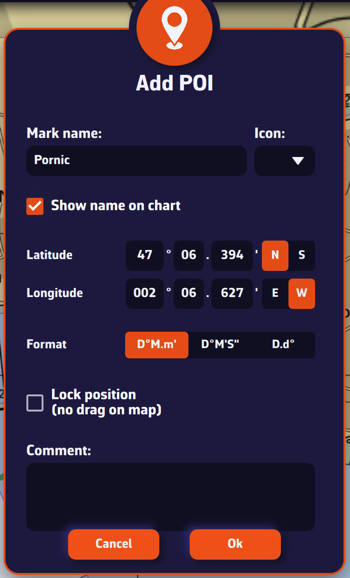 POI creation window: name, icon, position, format, lock, comment
A POI (Point Of Interest) is a point you place on the chart: an anchorage, a race buoy, a mark to round, a harbour. A POI can then serve as a destination, or as a waypoint of a route.
- Drag the chart to bring the desired spot under the target, at the centre of the screen. Zoom in to be precise.
- Tap the round orange “+” button, at the bottom right, then “Add POI”.
- Type the point’s name in “Mark name”, choose an icon if you want one, then tap “OK”.
On a computer, more directly: right-click at the desired spot on the chart, then “Add POI”. The POI is created under the pointer, without going through the target.
Going further
The POI window
| Field | Purpose |
|---|---|
| “Mark name” | Name of the POI. Required: “OK” stays inactive while it is empty. |
| “Icon” | Symbol displayed on the chart: anchor, port and starboard buoys, lighthouses, cardinal marks, lateral marks, channel marks, isolated danger or special marks, race buoys, coloured boats, shapes, wreck, rock, MOB, target… “Disabled” displays only a dot. |
| “Show name on chart” | Writes the name next to the POI. |
| “Latitude” and “Longitude” | Position of the POI, pre-filled with the chosen spot. You can correct it with the keyboard. |
| “Format” | Coordinate entry format: degrees and decimal minutes (D°M.m’), degrees, minutes and seconds (D°M’S") or decimal degrees (D.d°). It starts from the format chosen in the units settings. |
| “Lock position (no drag on map)” | Prevents moving the POI by mistake. |
| “Comment” | Free text: anchorage depth, instructions, times… |
Edit, move or delete a POI
Tap (or click) a POI on the chart: a menu opens.
- “Edit POI” reopens the same window. If you are navigating to this POI, the destination follows the new coordinates.
- “Move POI”: the POI gets bigger, drag it to its new position. On a touch screen, it is displayed slightly above your finger so that it stays visible. If you do not drag within 20 seconds, the move is cancelled. This entry does not appear for a locked POI: unlock it first with “Edit POI”.
- “Delete POI” asks for confirmation. If you were navigating to this POI, navigation stops; if the target was locked on it, the target returns to the centre of the screen.
The same menu also offers “Begin route” (a route that starts from this POI), “Route to this POI”, “Lock target on this POI” and “Goto”: see Create and edit a route and Navigate to a POI and follow a route. On the C-MAP background, it also offers “C-MAP AutoRouting” (see C-MAP AutoRouting). The anchor POI, placed by “Drop anchor”, has its own entries for the anchor alarm (see Anchor alarm).
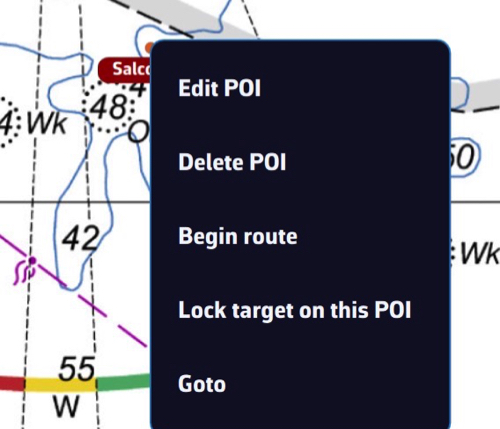 A POI’s menu on the chart
Zoom level at which details appear
With many POIs, the chart quickly becomes cluttered. The “Show details for zoom over” setting, at the top of the POIs tab of the left drawer, sets the zoom level from which the icon and name appear. Below it, each POI is just a dot. The value ranges from 5 to 18; it is 13 by default, roughly the view of a harbour.
If a POI does not appear
- Check the “POIs” box in the “Display” section of the layers menu: it shows or hides all POIs.
- Check the eye to the right of the POI in the POIs tab: it shows or hides that POI alone.
- If only a dot appears, zoom in further or lower the “Show details for zoom over” setting.
Your POIs are saved with your settings: when signed in to your NavimetriX account, you find them on your other devices (see Syncing between devices).