Chart navigation tools
BeginnerThe essentials
The chart carries several navigation tools. The most useful:
- The target: the cross at the center of the screen. It designates the point read by the automatic measure, the weather values and “Route to the target”.
- The automatic measure: tick “Auto measure” in the layers menu; each time the chart is moved, an arrow links the boat to the target with the distance, bearing and time to get there.
- Manual measures: “+” button, then “Add a measure”. Drag the ends; tap the label in the middle to delete the measure.
- In Navigation mode: the COG vector (course over ground) and the heading line ahead of the boat, the cross-track corridor and the laylines to the waypoint of a “Goto”.
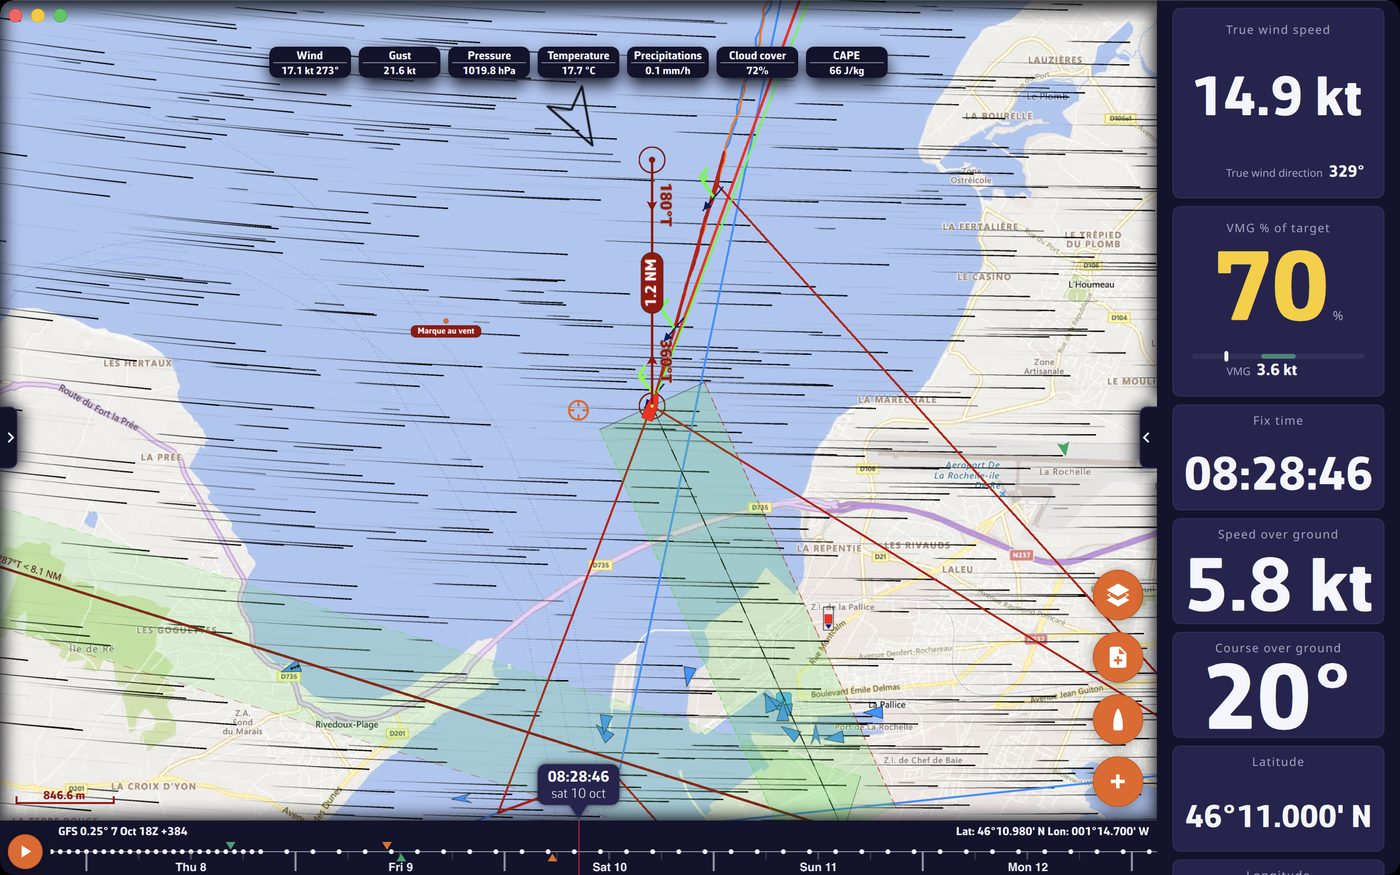 Navigation mode with a “Goto” to a POI upwind: red COG vector, green heading line, route corridor, green laylines to the POI and a manual measure with its distance and its two bearings
Going further
The target
By default, the target is at the center of the screen: drag the chart underneath it and zoom to place it precisely. In the layers menu, “Forecast display” section, the “Target” list offers:
- “Disabled”: no more target on screen;
- “Screen center” (default);
- “GPS position”: the target follows your boat;
- one of your visible POIs: the target locks onto it. The lock can also be set in a POI’s window.
The target can be set at any time, with or without a GRIB loaded. On tablets and phones, it is also used to choose an isochrone point for a routing from a pivot point (see Studying your routing and pivot points).
COG vector and heading line
In Navigation mode, two markers extend from the boat. They are set in “Settings”, “My Boat”:
| Setting | Values | Default |
|---|---|---|
| “COG vector”, “Duration” | 0 to 300 min | 60 min |
| “COG vector”, “Arrow” | yes or no | yes |
| “COG vector”, “Color” | your choice | red |
| “Heading line”, “Length” | 0 to 300 NM | 60 NM |
| “Heading line”, “Color” | your choice | green |
- The COG vector follows the course over ground. Its length is the distance covered during the set duration, at the current speed over ground: 30 minutes at 6 knots gives a 3-mile vector. It therefore lengthens and shortens with speed.
- The heading line follows the boat’s heading (HDG), over a fixed length. It only appears if NavimetriX receives a heading (compass from the instruments).
The cross-track corridor (XTE)
The cross-track error (XTE) is the distance between the boat and the line joining the starting point to the target waypoint. In Navigation mode, with a “Goto” in progress, the chart draws a semi-transparent corridor on either side of this line, bordered on the port side and the starboard side. It appears from the view of a harbor.
| Setting | Location | Values | Default |
|---|---|---|---|
| “XTE” (width on each side) | “Settings”, “Alarms”, “Cross-Track Error” (or “My Boat”, “XTE limit”) | 0 to 2000 m, in steps of 10 | 500 m |
| “Active” | “Alarms”, “Cross-Track Error” | yes or no | no |
| “Sound” | “Alarms”, “Cross-Track Error” | list of sounds |
The corridor is displayed whether the alarm is enabled or not. When enabled, the alarm sounds when the boat leaves the corridor. See Navigation alarms.
Laylines
A layline is the closest-hauled (or deepest downwind) course that leads straight to the waypoint without tacking again: once on it, it is time to tack or gybe. It depends on the wind, the current and the boat’s polar (best VMG angles).
Laylines are displayed when:
- Navigation mode is active;
- a waypoint is targeted by a “Goto”;
- the boat is moving and getting closer to the waypoint (they disappear if you move away from it);
- the “Laylines” box in the layers menu is ticked (the default).
The green layline corresponds to the starboard tack, the red one to the port tack (colors adapted in color-blind mode). The “Distance to layline” and “Time to layline” instruments give the distance and time remaining before the tack. Their smoothing is set in “Instruments”, “Damping”, “Laylines and waypoint” group (see Instrument types).
Manual measures
A measure is an arrow between two points, which stays on the chart until you delete it.
- Create: “+” button, “Add a measure”. If the boat is moving, the measure starts from the boat and follows it; otherwise, it starts from the center of the screen. On a computer, right-clicking the chart also offers “Add a measure”, which starts from the clicked point.
- With two fingers (touch screen): place two fingers on the chart and hold them still for a little over half a second: a measure is created between the two fingers.
- Read: the distance in the middle, and a double bearing at the ends: the bearing from the origin to the end, and the reciprocal bearing, each with a small direction arrow. When the arrow is too short on screen, the bearings, then the label, are hidden.
- Adjust: drag an end. It snaps to a POI, an AIS target or the boat, then follows moving targets; the label then shows the name of the object it is attached to.
- Delete: tap (click) the label in the middle (on a computer, a red cross appears on hover), or tap an end then “Delete measure”.
The automatic measure
| Setting | Location | Default |
|---|---|---|
| “Auto measure” | layers menu, “Display” section | no |
Each time the chart is tapped or moved, an arrow links the boat to the target at the center of the screen, then fades out two seconds after the last gesture. It needs a boat position. The label gives:
- the distance and bearing;
- the time to reach the point, calculated from your averaged speed over ground (30 seconds by default, “Laylines and waypoint” damping) and projected toward the point. It only appears if the boat is getting closer to the point (at least 0.3 knots toward it) and if it takes less than 99 hours; under 3 minutes, it is given to the second;
- with true wind on board, the wind angle at which this course would be sailed, with the tack (“P” or “S”), and the sail to carry if your polar has a Sailchart. These two values are the first to disappear when space is short.
The cursor measure (computer)
| Setting | Location | Default |
|---|---|---|
| “Cursor measure” | layers menu, “Display” section | no |
On a computer, a line links the boat to the mouse pointer, with the distance, bearing and time to get there, without moving the chart. Over a POI, it measures to the POI and names it. The box does not exist on a touch screen, where a finger does not hover over the chart.
See also
- Routings launched from the chart (Route to the target)
- Device GPS and external GPS
- Navigating to a POI and following a route (“Goto” and route following)
- Navigation alarms (cross-track alarm)
- Instrument types
- FAQ: How to measure distance on the chart?
- FAQ: How do I adjust the target position?
- FAQ: How do I adjust the display of COG and heading vectors?
- FAQ: How to display an XTE cross-track error corridor?
- FAQ: How to display laylines?