C-MAP charts: purchase, account and zones
BeginnerThe essentials
NavimetriX displays the generation X C-MAP vector charts, DISCOVER X and REVEAL X, purchased as a “Digital License” on the C-MAP store. The purchase is made from C-MAP, with a C-MAP account; NavimetriX then reads the charts of that account. A chart is not downloaded in one block: you choose the zones you need, which then remain available without Internet.
- Buy your chart as a “Digital License” on the C-MAP store (the detailed procedure is in the FAQ C-MAP charts in NavimetriX).
- In NavimetriX, open Settings, then “C-MAP Charts”, and tap “Account”.
- Tap “Sign in to C-MAP”. A login page opens in your browser: enter the email address and password of your C-MAP account, then return to NavimetriX.
- Check that the dot on the “Account” button is green. If not, reopen the “C-MAP Account” window: its first sentence says what is missing, and the “Register this device” button restarts the registration.
- Open “My Charts” and tap “Add a zone”. Adjust the rectangle on the chart, tap “OK”, tick the layers you want and tap “Download”.
- In the layers menu (round orange button at the bottom right), choose “C-MAP” in the “Maps” section.
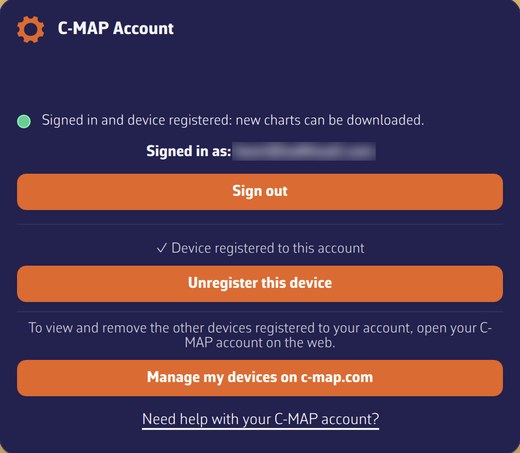 C-MAP account: green dot, status sentence, signed in as, device registered to this account
Going further
Which charts?
Only generation X C-MAP charts work: DISCOVER X and REVEAL X. REVEAL X adds to DISCOVER X satellite images, shaded relief and layers on the nature and hardness of the seabed. With DISCOVER X charts only, these layers are greyed out in NavimetriX. The full comparison, the coverage check before purchase and the duration of the update subscription are detailed in the FAQ C-MAP charts in NavimetriX.
The C-MAP account and device registration
The “C-MAP Account” window opens from the “Account” button on the “C-MAP Charts” page. This button carries a dot that shows the state of the account at a glance, and the window starts with a sentence that explains it:
| Dot | Sentence in the window | What it means |
|---|---|---|
| Green | “Signed in and device registered: new charts can be downloaded.” | Everything is in order. |
| Orange | “Registration of this device not confirmed: new charts cannot be downloaded.” | You are signed in, but NavimetriX could not verify the registration of the device with C-MAP, for example because the C-MAP server answered with an error. This does not necessarily mean the device is “not registered”: tap “Register this device”, or sign out and sign in again. |
| Red | “Not signed in to C-MAP: new charts cannot be downloaded.” | No session: tap “Sign in to C-MAP”. |
Charts that are already downloaded are always displayed, whatever the color of the dot and whether or not your subscription is up to date. Only downloading new zones depends on the account.
- Sign-in: “Sign in to C-MAP” opens the C-MAP login page in the browser. Once signed in, the window shows “Signed in as:” followed by your address. “Sign out” closes the session.
- Registration: each device that displays C-MAP charts must be registered to your account. A chart can only be registered on two types of device: a desktop computer or a chartplotter (the fixed navigation display of a boat). C-MAP limits their number per chart, phones and tablets being handled separately; the details are in the FAQ On how many devices can I use my chart?.
- Freeing a slot: “Unregister this device” removes the device from your account. Note that this deletes all the charts and zones downloaded on this device; NavimetriX asks for confirmation.
- Other devices: “Manage my devices on c-map.com” opens your C-MAP account on the web, where you can see and remove the other registered devices.
- The “Need help with your C-MAP account?” link opens our FAQ.
The choice of the “C-MAP” base map is specific to each device: enabling it on one does not enable it on your other devices, and so does not take up a slot on your C-MAP account there.
My Charts
“My Charts” opens from the “C-MAP Charts” page. At the top, “Available charts” lists the charts of your account. For each one:
- its name (for example CENTRAL AND WEST EUROPE);
- its type, REVEAL X or DISCOVER X, and its code (for example EW-T-227-R);
- its status: “Valid until” followed by the subscription end date, or, in red, “Subscription expired on” followed by the date.
An expired chart remains displayed in the zones already downloaded, but no longer allows downloading new ones or updating them.
Below, “Downloaded zones” lists your zones, with the code of the chart they come from. As long as the page is open, their purple outline is drawn on the chart. Tap a zone to center it.
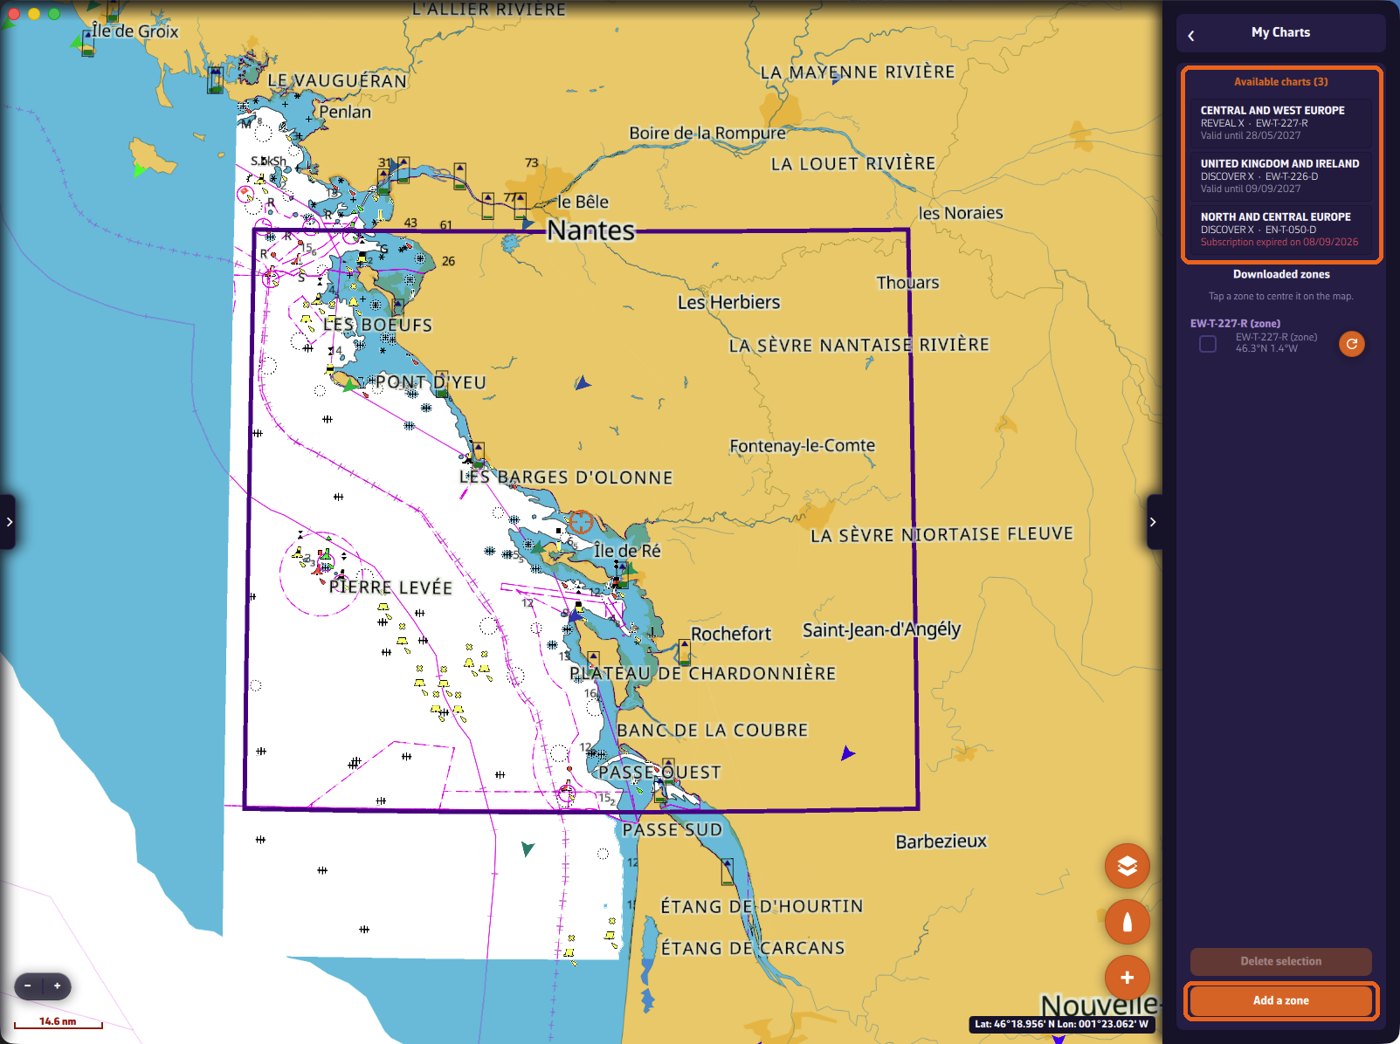 My Charts: available charts, downloaded zone and its outline
Adding a zone
“Add a zone” is only active if you are signed in to your C-MAP account, the device is registered and your account contains at least one chart. Otherwise the button is greyed out and a line just below says why: “Sign in to your C-MAP account to download zones.”, “The registration of this device is not confirmed: zones cannot be downloaded yet.” or “No C-MAP chart licence found on your account.”
- Tap “Add a zone”. The settings drawer closes and a rectangle appears on the chart.
- Move the rectangle and adjust it with its handles. A zone measures at most 300 miles by 300 miles: beyond that, the message “Zone too large (max 300 × 300 NM)” appears and it must be reduced.
- Tap “OK”. NavimetriX checks the zone:
- if several of your charts cover it, the “Choose a chart” window lists them with the share of the zone each one covers; choose one and tap “Continue”;
- if part of the zone falls outside your chart, it is reduced to the covered part, and a message indicates the share removed;
- if no valid chart covers it, or if it is already downloaded, a message says so.
- The “Layers to download” window opens. If you wish, give the zone a name (“Zone name (optional)”), tick the layers and tap “Download”. Only the navigation charts layer is ticked by default: it is the only essential one. Satellite images and shaded relief (REVEAL X) are much larger; the size of each layer and the “Total” are shown before you confirm.
A banner shows the progress, and you can keep using the application meanwhile. Once the zone has been received, the detailed chart is displayed there, even without a connection.
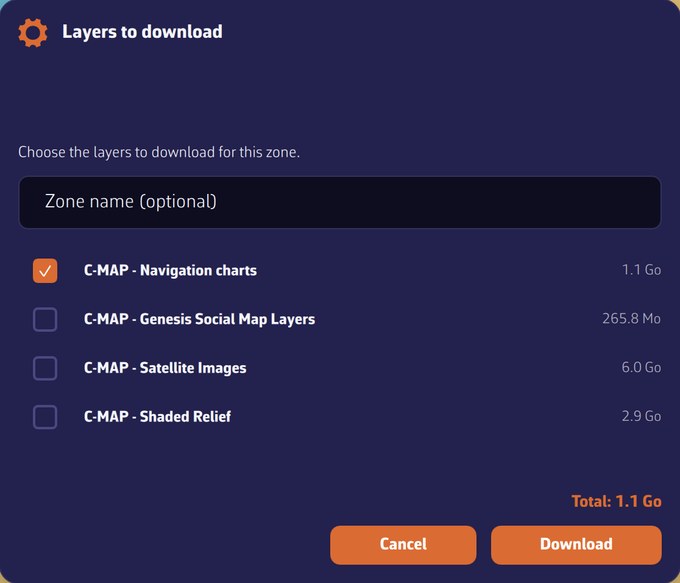 Layers to download: navigation charts, Social Map layers, satellite images, shaded relief
Updating, completing or deleting a zone
- Update or add layers: tap the round refresh button to the right of the zone, in “My Charts”. NavimetriX analyzes the zone, then offers the layers to add or update. Tick them and tap “Download”. With no layer ticked, the button becomes “Save”: it is then used to rename the zone. Do not use “Add a zone” for this.
- Empty zone: a zone whose download was interrupted stays listed with the mention “no data downloaded”; the same round button downloads it again.
- Delete: tick one or more zones, tap “Delete selection” and confirm.