To compute a routing, you must first have:
- Selected your boat’s polar.
- Created a route.
If not yet, see the “Create a route” FAQ. - Downloaded the weather forecasts along the route.
If not yet, see the “Download a GRIB” FAQ.
Once these 3 steps are done, you can compute a routing by pressing the “Compute routing” button.
Remember: a routing is only useful if it’s correctly calibrated and you understand the computed result. Doing a single run and treating it like a train timetable will, at best, lead to disappointment.
We therefore recommend this approach:
- Load the weather, try to understand it and especially the risks,
- always start simple:
- a route that isn’t too complex, so the solver can “breathe”,
- route with wind only,
- no constraints on wind or sea state,
- add currents and waves only if needed,
- for thorough users, study routing stability by varying:
- the wind GRIB speed percentage,
- the polar efficiency percentage,
- run again with another weather model,
- synthesize, understand possible deviations and how you’d react,
- repeat every 12 hours…
1️⃣ Compute a routing

Click the “+” button, then select “Compute a routing”. A screen titled Routing opens.
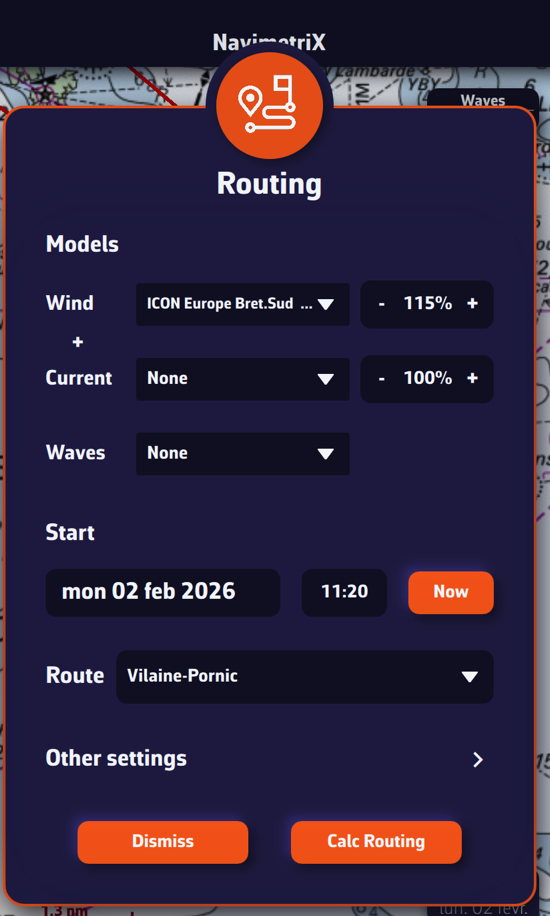
You can choose three forecast models:
- a wind model,
- a current model,
- a wave model.
To begin, select only a wind forecast file.
We recommend setting the wind factor to 115%. This means taking 115% of the wind speed from the GRIB, reflecting that GRIB wind speeds are often lower than reality.
In a second step, following our recommendations, select a current model and a wave model.
2️⃣ Set the departure date and time
Click the date to open the calendar and select your departure date. Click OK.
Click the time to open hour/minute selection, then also validate with OK.
3️⃣ Choose the route
Select the route you just created.
4️⃣ Other settings
These are less frequently modified, but here are the main parameters at a glance.
- Adjusting the boat polar

- Polar
See the “Choose your polar” FAQ. - Polar efficiency for winds below 10 kn
Most of the time, speed polars are theoretical and optimistic. If in doubt, set about 80% for a cruising boat. - Polar efficiency for winds above 20 kn
Similarly, polars are often optimistic. If in doubt, set about 90% for a cruising boat.
For wind speeds between 10 and 20 kn, the app linearly interpolates between the two efficiency values to keep the polar “continuous”. - Night-time polar efficiency
This can help if you reduce sail area at night (e.g., take a reef or drop the spinnaker). This multiplicative factor stacks with the two efficiency settings above. Leave 100% to start with. - Minimum upwind true-wind angle
Again, polars are often optimistic. This lets you “trim” the polar to a realistic angle. For example, a Sun Fast 3200’s theoretical polar might show optimal upwind at 36° TWA in 12 kn. In practice it’s more like 40–45°. We suggest 40° with crew, 45° single-handed or cruising. - Maximum downwind angle
For safety: to avoid accidental gybes, don’t sail dead downwind even if the polar suggests it. Set about 165°.
- Routing algorithm
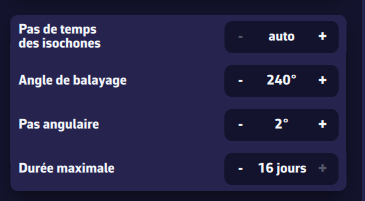
- Isochron time step
Sets the duration of isochrones. We strongly recommend leaving it on Auto. - Sweep angle
Search angle for optimal routes. The faster the boat, the higher you can set it (up to 360°). The default 240° is well-suited to cruising boats and is already higher than the 180° used by most routing software. - Angular step
The angle between each computed route segment.
Leave 2° — that’s usually sufficient. You can go down to 1° for more precision (slower), or 5° on slower devices. - Maximum duration
By default, routing can span the entire GRIB forecast range (up to 16 days). You can limit it (e.g., 3, 5 or 7 days) to compare optimal routes and assess stability. Thanks to a display trick in NavimetriX, this is almost unnecessary.
- Using the engine
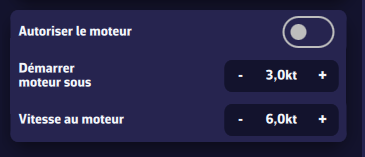
- Allow engine
Check to enable this mode. - Start engine below
Sailing speed below which the engine is started. - Engine speed
Speed once the engine is running.
- Special zones
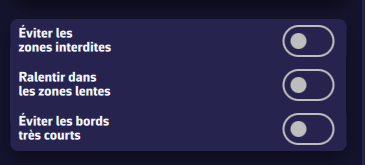
- Avoid restricted zones
Check to make the routing avoid these zones.
These zones can include:- Traffic Separation Schemes (TSS),
- wind farms,
- shoal/shallow areas.
Note: initially, these zones cannot be created or edited. This will come in a future update.
- Constant wind
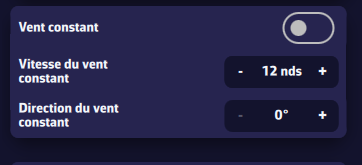
Useful for studying, for example, the effect of current in a bay. It freezes the wind (e.g., as measured at the masthead) to understand the current’s influence on the optimal route.
- Constant wind
Check to enable the mode. - Constant wind speed
Probably the value measured by your anemometer. - Constant wind direction
Probably the value measured by your wind vane.
- Wind and sea-state limits
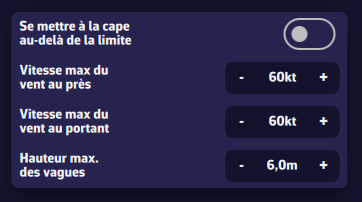
Allows you to constrain the optimal route. Use with care, otherwise the routing may not converge. For example, don’t set a max downwind wind speed of 20 kn for an ocean passage.
- Heave-to beyond the limit
Sets boat speed to 0 kn when a wind or sea-state limit is exceeded.
Most routing software uses a “hard” constraint: you never go through that area once the limit is reached. That can be a bit silly: if a limit is exceeded for 3 hours during a long passage, it’s probably wiser to heave-to for 3 hours than to add hundreds of miles or days to the route. - Maximum wind upwind
Wind speed above which the constraint applies for angles from upwind to beam reach. - Maximum wind downwind
Wind speed above which the constraint applies for angles from beam reach to dead downwind. - Maximum wave height
Maximum “Total sea” height above which the constraint applies.
- Influence of cross sea
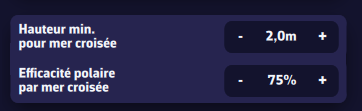
We define a cross sea when the angle between total sea direction and wind sea direction is between 45° and 135°. If the total sea height is high enough, the boat is significantly slowed. You can set the slowdown parameters here.
- Minimum height for a cross sea
Minimum total sea height. - Polar efficiency in cross sea
Multiplicative factor to be combined with the other polar efficiency parameters.
- Reset parameters

It’s easy to get a bit lost among all these settings. The default values were chosen carefully. Press this button to restore them.